How to Vectorize a Textile Design for Screen Printing
To vectorize a textile design, you convert a pixel-based image (a scan, a phone photo, or an AI-generated motif) into mathematical paths that scale to any size without blurring. Screen and rotary printing depend on this conversion: an engraver needs hard-edged, flat color areas, not soft pixels. This guide walks through the full raster-to-vector workflow for textile production: preparing the source file, where Illustrator's auto-trace breaks down on dense textile artwork, an AI workflow that gets a swatch photo to engraving-ready separations, and the cases where you should not vectorize at all.
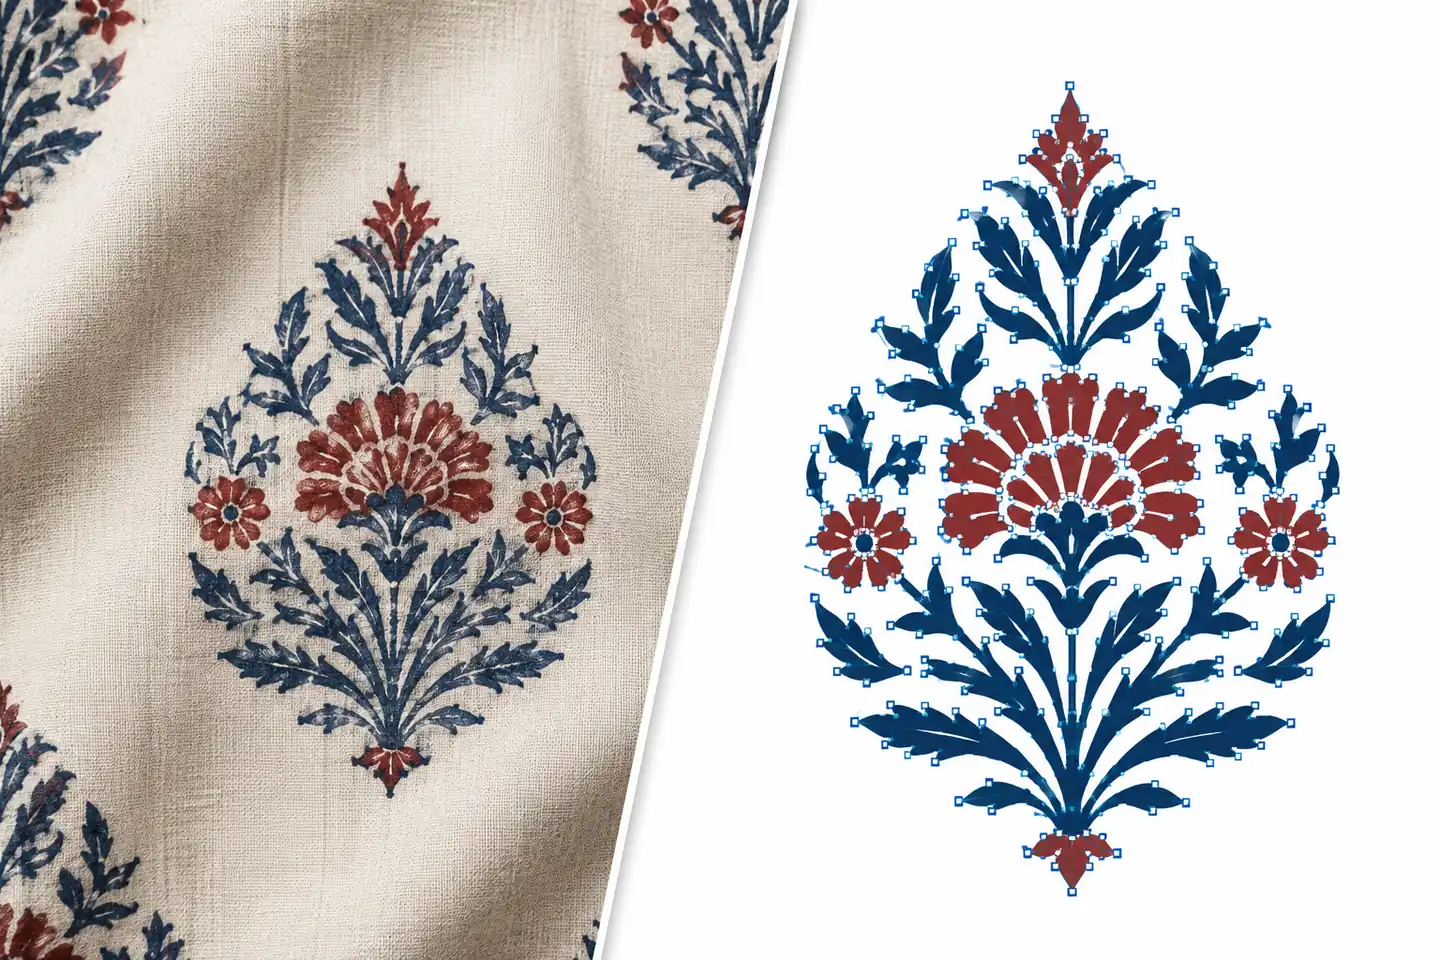
Why Screen and Rotary Printing Still Run on Vector-Clean Artwork
Digital inkjet gets the headlines, and the growth is real: the digital textile printing market is projected to reach $4.43 billion in 2026, growing at 14.4% a year to $7.59 billion by 2030. But the volume still runs on screens. By weight of production, roughly 61% of the world's printed textiles come off rotary screen machines and another 23% off flat screens. If you supply mills, job-work print houses, or exporters, the majority of your designs will end up engraved on a cylinder or exposed on a flat screen.
That production reality dictates the artwork. A rotary screen is a nickel mesh cylinder with a fixed repeat circumference (640mm is the common standard, with sizes running up to 1018mm and beyond) and a mesh count typically between 40 and 195. Every color in the design becomes one physical screen. When the artwork arrives as a soft-edged JPEG, the engraver has to interpret where each color actually starts and stops. Anti-aliased pixels become ragged edges at mesh resolution, touching motifs merge, and the back-and-forth with the design studio begins. Clean vector paths remove that interpretation: the boundary of every color area is defined exactly.
Raster vs Vector: What the Difference Means on Fabric
A raster file describes a grid of colored pixels. A vector file describes shapes: curves, anchor points, and fills. On a screen the two can look identical. On a 64-inch printing table the difference is the whole job.
| Property | Raster (JPEG, PNG, scan) | Vector (AI, EPS, SVG, PDF) |
|---|---|---|
| Scaling | Blurs and pixelates when enlarged | Scales to any repeat width with no quality loss |
| Edges | Soft, anti-aliased boundaries | Hard, exact color boundaries an engraver can trust |
| Color areas | Millions of blended shades | Flat fills, one per screen, spot-color named |
| Editability | Repainting pixels by hand | Move a node, recolor a fill, adjust a keyline |
| Typical source | Swatch scans, phone photos, AI generations | Traced or redrawn production artwork |
| Best print route | Digital inkjet, tonal designs | Screen and rotary, flat spot-color designs |
The catch is that almost nothing arrives in vector form. Traders bring phone photos of running fabric. Buyers send low-resolution mood board crops. Archives hold decades of paper and fabric swatches. Even AI-generated motifs are raster images. Turning that material into production artwork is why vectorization is a daily task in a textile studio and not an occasional one.
The Manual Route: Illustrator Image Trace and Where It Breaks
The standard manual path is Adobe Illustrator's Image Trace. It works, and every production designer should know it. But Adobe's own Image Trace documentation is candid about the limits: large images beyond roughly 1500 pixels trigger performance warnings, gradients are converted into bands of neighboring flat shapes, and small, detailed artwork typically loses its fine detail in the trace. Adobe also recommends cleaning dust and scratches from the source and keeping slight anti-aliasing around edges before tracing, which is exactly the prep work most studios skip when a deadline is close.
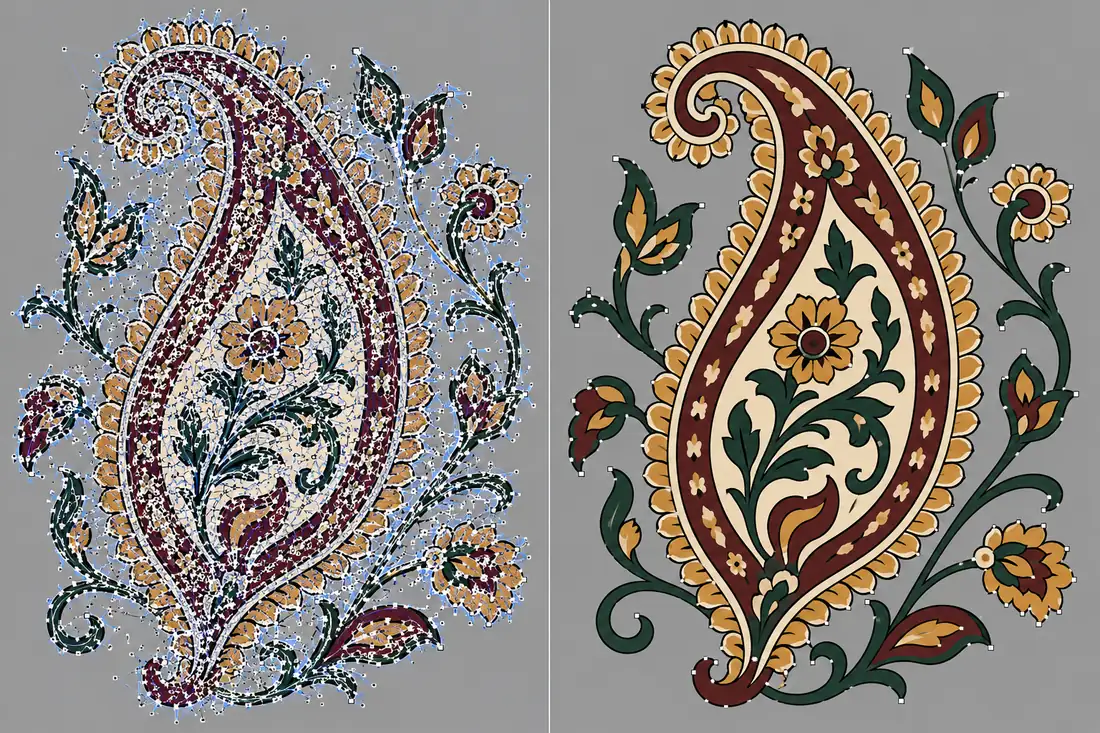
Dense textile artwork is the worst case for auto-trace. A paisley jaal with fine tendrils, a buti scattered on a textured ground, or a kalamkari-style outline design will trace into thousands of paths, many of them noise. The designer then spends the afternoon deleting stray anchor points, rejoining broken keylines, and simplifying curves so the file is light enough to engrave. Dedicated desktop tracers exist for this reason: Vector Magic, the tool screen printers most often recommend, runs $7.95 a month or $295 for the desktop version and still works best on images that were digitally rasterized from clean vector originals rather than on scans and photos, which is precisely what textile studios have.
Tip
How to Vectorize a Textile Design with AI: A Worked Example
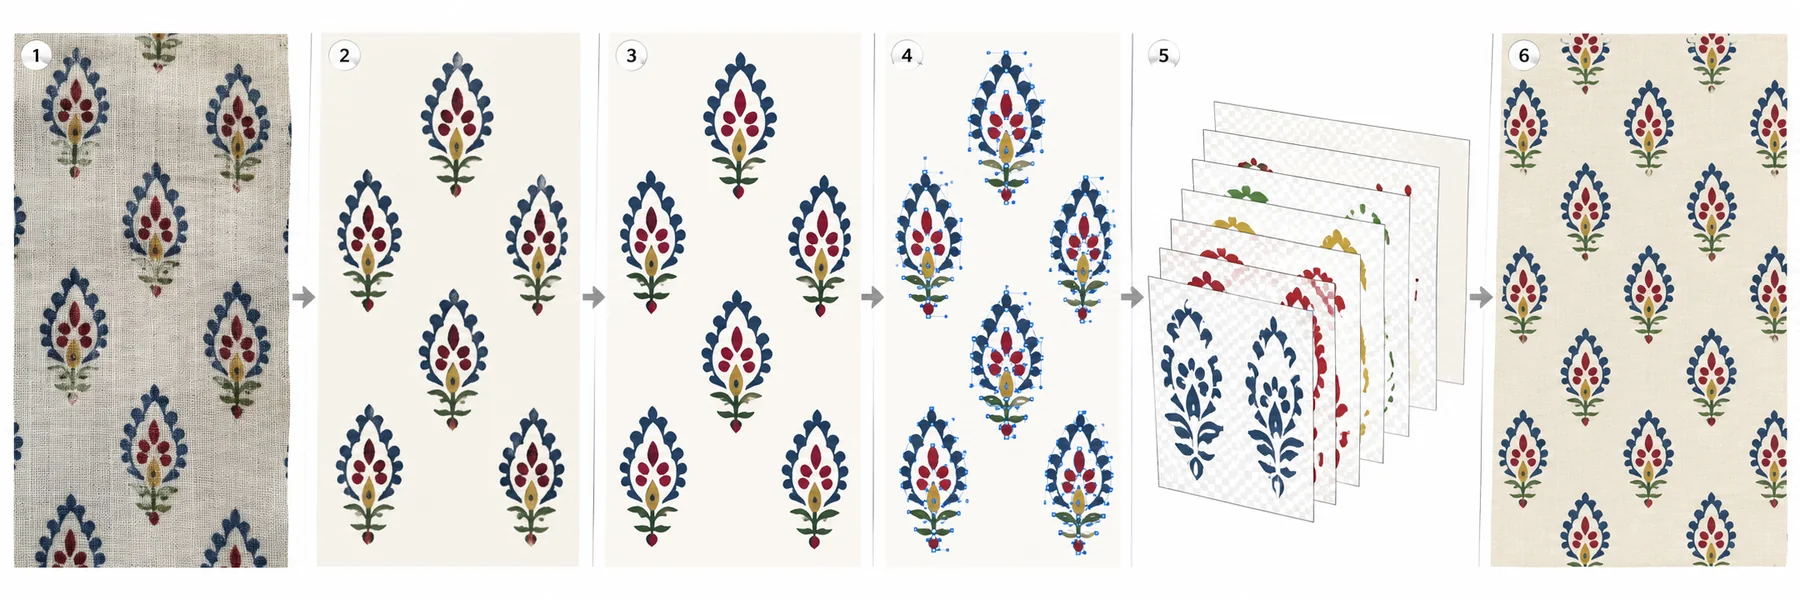
Here is the workflow as it runs in practice. The scenario is one every Surat or Jaipur job-work house knows: a trader walks in with a phone photo of a running block-print buti design and wants it as a 6-color screen job on a different base fabric. The photo is slightly blurred, the weave texture shows through the motif, and the repeat is not usable as shot.
Step 1: Strip the fabric texture from the source
Run the photo through Scanned Fabric Removal to erase the weave and surface noise so the motif reads as flat printed color. This single step is what separates a usable trace from a noisy one, because texture is the main thing auto-tracers convert into junk paths.
Step 2: Recover the edges
Phone photos of fabric are never critically sharp. Anti-Blur restores edge definition so color boundaries land where the block actually printed them. If the motif needs isolating from its ground first, add background removal before this step.
Step 3: Vectorize
With a clean, sharp, flat-color source, the Vectorizer converts the design into scalable vector paths. Because the input has already been cleaned, the output is a small set of meaningful shapes instead of thousands of speckle paths, and the fine tendrils that Image Trace drops are preserved.
Step 4: Generate the outline layer
Block-print designs live and die by their outlines. Border & Outline generates a clean, edge-detected outline version of the motifs, which becomes the keyline screen for the job. Trapping between that outline and the fill colors is still set by the separator at the next step.
Step 5: Separate the colors
Color Separation reduces the design to the agreed 6 colors and outputs one clean, editable layer per screen. The full production logic behind this step is covered in our guide to AI color separation for screen and rotary printing.
Step 6: Set the repeat and scale to production
Put the motif into a proper repeat structure (our seamless repeat guide covers the four production repeat types), then use Super Scaler if the job also needs a high-resolution raster export at fabric width for digital sampling. The vector file goes to the engraver; the raster export goes to the sampling table.
The whole chain runs in minutes per design rather than the better part of a working day, and none of it requires a prepress specialist to be free at that moment. For studios dealing with genuinely bad source files, low-resolution references, and watermarked images, the companion workflow in fixing low-res files for large-format print picks up where this one ends.
Preparing Files Before You Trace: A Checklist
- Shoot flat and square. Photograph swatches straight-on in even, diffuse light. Perspective distortion becomes skewed motifs that no tracer will correct.
- Start from the largest source you have. Detail that is not in the image cannot be traced. If the only source is small, upscale before vectorizing, not after.
- Clean before you convert. Dust, folds, watermarks, and weave texture all become paths. Remove them at the raster stage.
- Keep edges slightly soft going into the trace. Adobe's guidance is right here: a pixel of anti-aliasing helps the tracer draw smooth curves. Over-sharpened, jagged edges trace as jagged paths.
- Decide the color count first. Agree the number of screens with the printer before separation, not after. Every extra color is an extra screen, extra registration risk, and extra cost per meter.
From Vector Paths to Screens
A vector file is not yet a production file. Three things turn one into the other. First, name the colors: map each fill to a Pantone TCX reference with Color Matching so the conversation with the dye house and the buyer happens in numbers, not adjectives. Second, check the trapping: wherever two colors butt together, the keyline or a small spread has to absorb registration movement on the machine. Third, package the handoff: one named layer per color, text converted to outlines, and an EPS, AI, SVG, or PDF export, which are the formats engraving houses accept as standard. If the printer also wants a raster proof at fabric width alongside the vector file, Ready to Print upscales the design to print resolution in one pass. A ten-minute review of layers, outlines, and formats before sending saves the classic two-day round trip of engraver queries.
When to Vectorize and When to Leave It Raster
Not every design should make this journey, and knowing the difference saves both engraving budgets and arguments with buyers. The decision follows the artwork, not the habit of the studio.
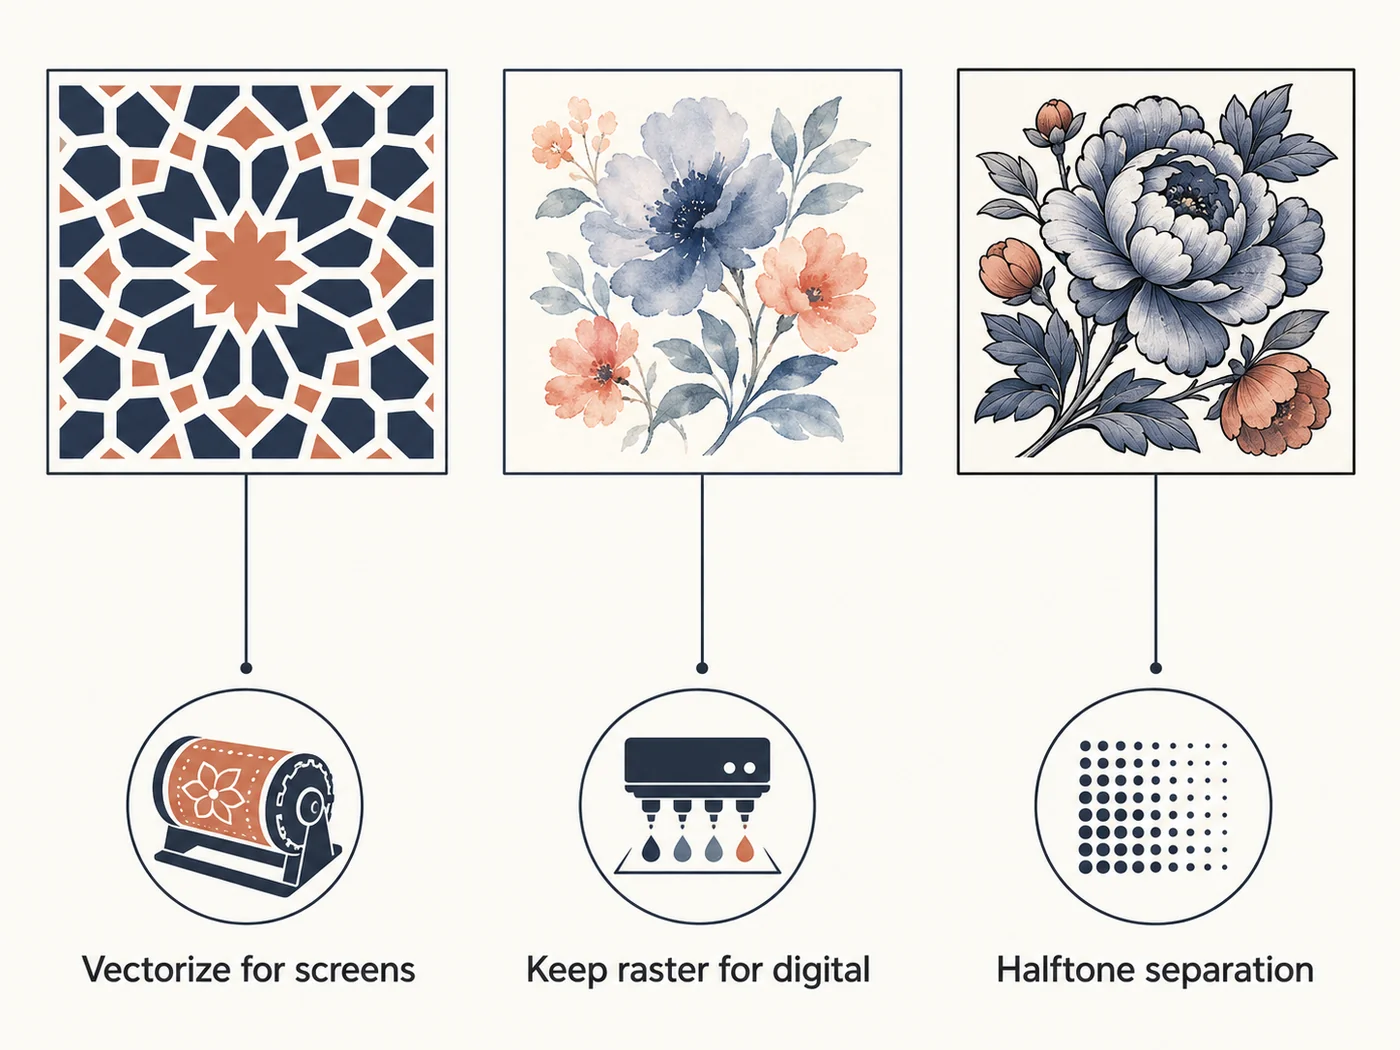
Vectorize when the design is built from flat color areas and the job is headed for screens. Block-print styles, geometric jaals, stripes and checks with clean fills, keyline florals, and any motif a buyer wants delivered as editable artwork all belong in vector form. The same applies when one small motif has to serve many sizes: a buti that prints at 2cm on a shirting and at 20cm on a bedsheet border only stays sharp across both if it exists as paths rather than pixels.
Leave it raster when tone carries the design. Watercolor washes, shaded ombres, photographic placements, and dense painterly florals depend on thousands of blended shades; flattening them into vector fills strips out exactly what makes them sell. Those designs go to digital printing at high resolution, and the preparation problem becomes sharpness and scale instead of paths. That is a different workflow with different tools, and it is the reason a production studio keeps both pipelines running side by side.
The gray zone is the tonal design that must run on screens anyway, usually because the order volume makes rotary far cheaper per meter than digital. Those jobs go through halftone separation, where tones are simulated with dot patterns on a limited number of screens. Vectorization plays only a supporting role there, typically for the keylines and solid areas, while a separation specialist builds the tonal screens. If most of your work looks like this, invest in the specialist relationship first and the tracer second.
Where AI Vectorization Falls Short
Honesty matters more than enthusiasm here, because a wrongly vectorized design wastes engraving money. Three limits are worth respecting. First, tonal designs should mostly not be vectorized. Watercolor florals, shaded ombres, and photographic motifs are gradient-driven; forcing them into flat vector shapes produces visible banding, and they print better as high-resolution raster files through digital, or as halftone separations built by a specialist. Second, no tracer understands design intent. The algorithm cannot know whether a broken line in a hand-drawn ajrakh border is damage to repair or character to keep. A designer still makes that call, shape by shape where it matters. Third, production judgment stays human. How much trap a slightly off-square rotary machine needs, whether a fine tendril will hold on a 40 mesh screen, and which of two near-identical reds the buyer will approve are decisions that come from the floor, not the file. The AI removes the tracing labor; it does not replace the separator's final review.
Frequently Asked Questions
What file format should a vectorized textile design be saved in?
The formats engravers and screen makers accept most widely are EPS, AI, SVG, and PDF. EPS and AI travel best between studios because they preserve spot color naming and layer structure. Whatever format you choose, keep each print color on its own named layer and convert any text to outlines before handoff.
Can I vectorize a fabric scan or a phone photo of a swatch?
Yes, but not directly. A raw scan carries weave texture, shadows, and lens blur that any tracer will faithfully convert into thousands of junk paths. Clean the image first: remove the fabric texture, sharpen soft edges, and cut the background. Once the motif reads as flat color areas, vectorization becomes reliable.
How many colors should a vectorized design have for screen printing?
Most production screen and rotary jobs run 4 to 8 colors, because every color is a separate screen with its own engraving, registration, and cost per meter. Reduce the palette before or during separation, and confirm the count with your printer before finalizing the vector file.
Is Illustrator Image Trace good enough for textile designs?
For a simple 2 or 3 color logo or a bold geometric motif, often yes. For dense textile artwork such as paisleys, jaals, and fine florals, auto-trace tends to lose small details, merge touching motifs, and turn gradients into banded flat shapes. Expect significant manual node cleanup, or use a tracer built for textile artwork.
Do digital printing designs need to be vectorized too?
Usually not. Digital inkjet printing works happily from high-resolution raster files, which is why tonal and photographic designs are printed digitally. Vectorize when the job is going to screens or rotary cylinders, when a buyer asks for editable artwork, or when you need to scale a small motif far beyond its source resolution.
The Bottom Line
Vectorization is the bridge between the messy sources a textile studio actually receives and the exact artwork screens and cylinders demand. Learn the manual route, because you will always need it for judgment calls. But move the repetitive part of the work (texture cleanup, edge recovery, tracing, keylines, separation) onto tools built for fabric. The studios winning job-work orders are not tracing paisleys node by node at midnight. They are reviewing clean files and quoting faster than the shop next door.
Try it on your own worst source file: upload a swatch photo and run Scanned Fabric Removal, Vectorizer, and Color Separation on Textile Designer AI, then judge the paths the way your engraver would.